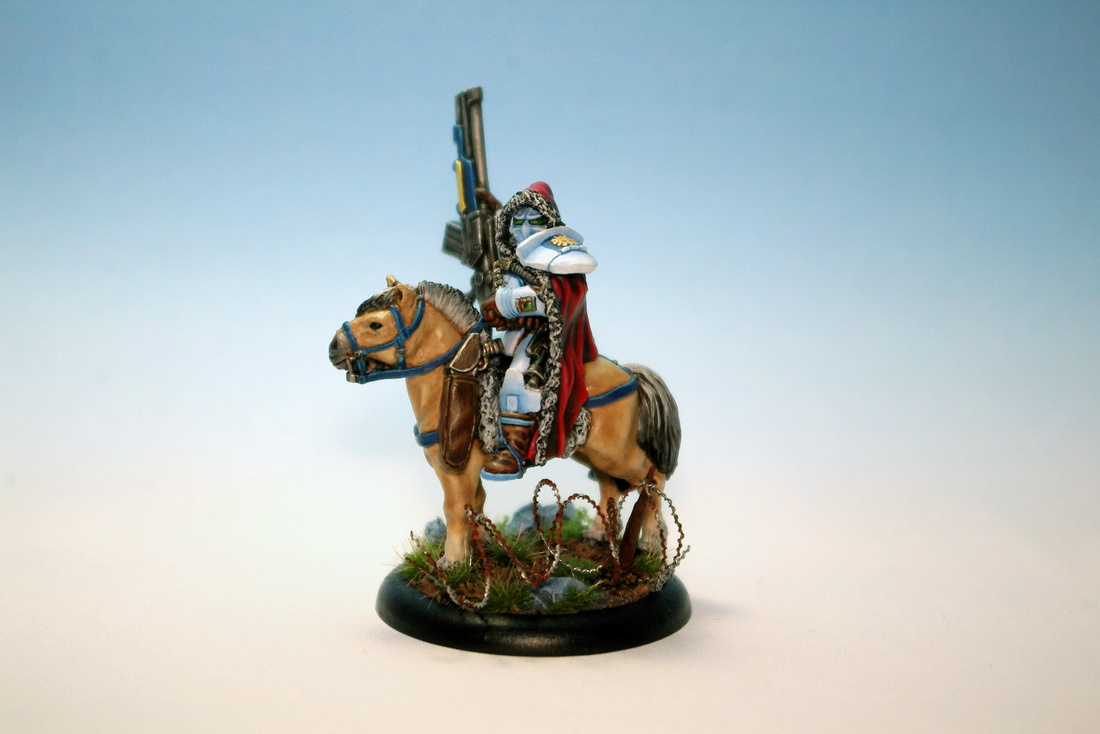
Many people asked me about my Venusian Ranger colour scheme and requested a painting tutorial. Of course, I will be happy to share my "secret" recipe for the colour scheme though it is nothing overly complicated. The problem with the way I painted these guys is that I was not able to make many detailed WIP images as the painting of the armour has to be done rather quickly to avoid wasting too much paint and I did not have any other set of hands available to take quality pictures. Anyway, lets start from the beginning.
Note: for the purposes of this tutorial, I will use pictures taken in the course of painting the Venusian Rangers, Max Steiner and also a Venusian Marshall as I decided to make them all in the same colour scheme.
Phase 1 - Preparation, undercoating
This is nothing new. As with all your miniatures, you want them to be smooth without any mould lines ruining your future paintwork. In Venusian Rangers, this is most prominent on their shoulder pads, otherwise there are no big pieces of metal to be removed. As for the undercoat, the white primer was obvious choice as I wanted the colours to be vibrant and bright. Horse of the Venusian Marhsal was primed using Armypainter Leather Brown.


Now, that was the easiest part...from now on, it only gets harder. The following step is again the usual basecoating that helped me get the general idea of where each colour will be located and provided much needed colour base for further, more elaborate paintjob.
Phase 2 - Basecoating
For the Rangers that were not yet painted (as some were about 10 or more years ago) I decided to use the following paints as the basecoar for different parts (paints used were ArmyPainter brand if not stated otherwise):
Armour, boot straps - Electric Blue
Capes, cloaks - Chaotic Red
Eyes - Angel Green (also used on Max Steiner's chestplate)
Boots, trousers - Oak Brown
Gloves, Steiner's boots - Leather Brown
Gun parts, pipes - Gun Metal, Weapon Bronze


Phase 3 - Boots, gloves, belts, etc.
As the boots, gloves, belts, etc. were painted Leather Brown (or in some cases Oak Brown), I decided to shade them first to bring out the edges and raised parts. To do this I washed all these brown parts of equipment with Vallejo Brown Ink. This really helps as the raised parts are very clearly visible and allow for easy highlighting after the ink dries. Next step is to highlight those raised areas on boots and knuckles on gloves and belt/trousers edges with leather brown and subsequently with mix of leather brown and skeleton bone (1:1). Of course you need to dilute the paints enough to avoid sharp transitions between levels of brown. I then washed the brown parts in Strong Tone Quickshade. As this connected the colours quite nicely (even more than expected), I decided to add another highlight of Leather Brown and Skeleton Bone (1:2) and apply this watered-down mix on the most raised and outward facing parts of gloves and boots. Thinking about this now, I probably should have chosen Soft Tone Quickshade as it has more brownish tinge (instead of the Strong Tone). Thus I might have achieved more natural appearance.
As the boots, gloves, belts, etc. were painted Leather Brown (or in some cases Oak Brown), I decided to shade them first to bring out the edges and raised parts. To do this I washed all these brown parts of equipment with Vallejo Brown Ink. This really helps as the raised parts are very clearly visible and allow for easy highlighting after the ink dries. Next step is to highlight those raised areas on boots and knuckles on gloves and belt/trousers edges with leather brown and subsequently with mix of leather brown and skeleton bone (1:1). Of course you need to dilute the paints enough to avoid sharp transitions between levels of brown. I then washed the brown parts in Strong Tone Quickshade. As this connected the colours quite nicely (even more than expected), I decided to add another highlight of Leather Brown and Skeleton Bone (1:2) and apply this watered-down mix on the most raised and outward facing parts of gloves and boots. Thinking about this now, I probably should have chosen Soft Tone Quickshade as it has more brownish tinge (instead of the Strong Tone). Thus I might have achieved more natural appearance.


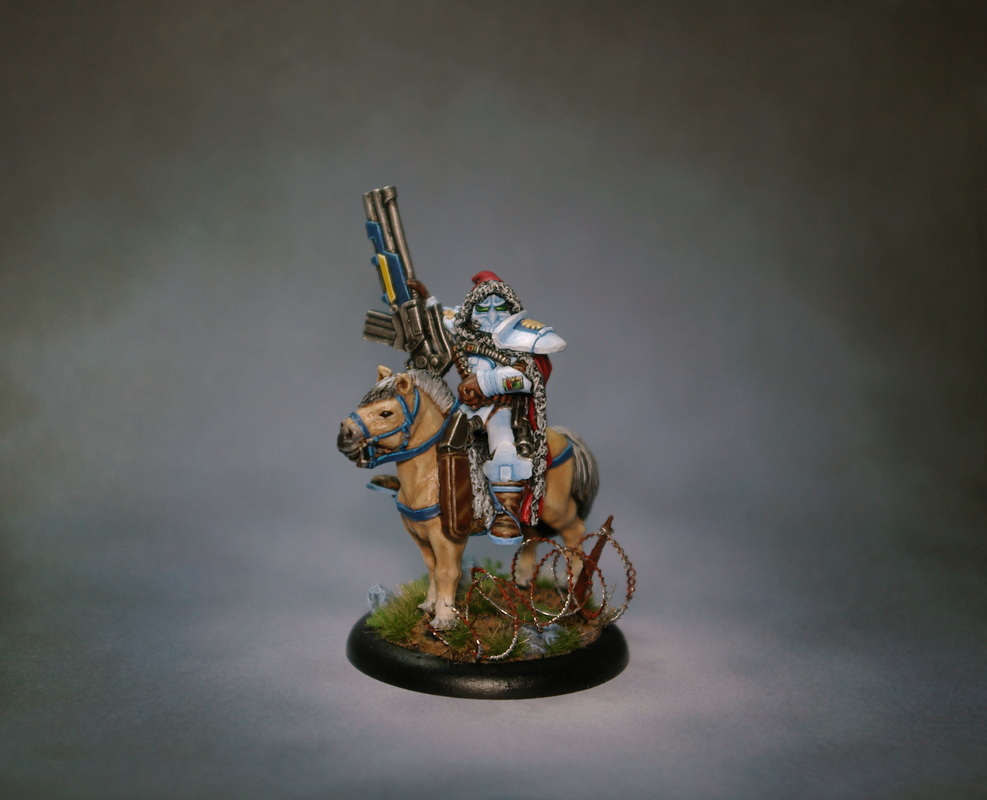
Phase 4 - Armour
This is probably the hardest part of the model whether you are painting it on the Marshall, normal Rangers or Max Steiner. What I wanted to achieve was smooth light blue to white transition to make the Venusians similar to the models painted by my brother 15 years ago. Luckily, the variety of options is much wider nowadays. Originally, my brother used a very slow and exhaustive blending process (and not very good paints) which I wanted to avoid (as blending is not exactly my cup of tea). I found out that matt varnish and glaze medium can be very useful for this purpose. In the course of painting 6 Rangers, I develop a layering process using a glaze medium (matt varnish) that can produce quite satisfying results. Lets have a look at it now:
This is probably the hardest part of the model whether you are painting it on the Marshall, normal Rangers or Max Steiner. What I wanted to achieve was smooth light blue to white transition to make the Venusians similar to the models painted by my brother 15 years ago. Luckily, the variety of options is much wider nowadays. Originally, my brother used a very slow and exhaustive blending process (and not very good paints) which I wanted to avoid (as blending is not exactly my cup of tea). I found out that matt varnish and glaze medium can be very useful for this purpose. In the course of painting 6 Rangers, I develop a layering process using a glaze medium (matt varnish) that can produce quite satisfying results. Lets have a look at it now:
- White layer (Matt White + Glaze Medium) - Mix white paint, glaze medium and water (1::2:3-4) to create a transparent white glaze you will wash the Electric Blue armour with. This takes the edge off the blue base colour. Very important part of this process (including the step 2) is the mixture. If you do not have glaze medium, do not buy it and use matt varnish instead (although the mixture ratio will probably be different). Also, keep the flow of the glaze by adding some water in the course of painting. You will notice when the mixture is not watery enough as it will behave like normal colour rather than glaze.
- Repeat the previous step 2-3x but DO NOT paint over the whole armour. Instead, wash away from the parts you want to remain blue-ish (like recesses) towards the edges, especially on shoulder pads as there are the most visible. Each layer you add should start slighty further from blue and towards the edges. For these steps, you can adjust the mixture to (1:1:3) if you want to work faster with better coverage. Also DO NOT REPEAT MY MISTAKES and stop adding layers when you achieve a satisfying effect. I added about 4 layers of white and ended up with too white model so I had to add blue wash again.
- The third step helps you achieve better smoothness and cover the potential "layer" impression that might be caused by adding to many layers and covering the blue too much. Prepare a mix of Electric Blue (or whichever blue you used for the armour as a base colour), Glaze medium (no matt varnish in this step) and water in 1:1:3 ratio. Also prepare a second clean and dry brush (thin one - I used AP Highlighting brush for glazing and AP Precise Detail brush as a second brush) and a paper towel.
This might look a bit tricky but it is not, on the contrary.....just load your brush with few drops of the mixture and brush it over one piece of armour (e.g. one shoulder pad). Give it few seconds to settle, then take the smaller brush (dry one) and partially remove the glaze from the parts you want whiter and the edges. This will create a smooth blue-white transition while keeping the light blue tinge on the whole armour piece and edges simply white. It is entirely up to you how much of the glaze you want to remove or keep and you can create various effects this way. Work one armour piece at the time to have enough time to play with the glaze before it dries. Always keep your second brush dry as the paint you remove with it might spoil your work. - This is not another step but rather a summary of observations and tips:
- TAKE YOUR TIME and let the glazing mixture on the model dry before you add another layer
- You can create your own effect just by alternating the mixture or colours slightly ;-)
- There is a rim on the chest plate. You can either leave it white and glaze it blue when working on the armour or you can use some darker blue colour to make it stand out (I used this on Max Steiner and it looks quite good so I decided to used it on Marshall too, see the picture of Steiner below for detail). Just paint it with Deep Blue, then add some highlights of Ultramarine Blue (1st), Crystal blue (2nd), and Crystal Blue + White (3rd) on the raised corners.


SHORTCUT FOR THOSE WHO LIKE TO EXPERIMENT:
When adding more blue glaze to the model, I noticed that if I had the glaze with better ratio, I could have saved some time by skipping the whole white layering part. So if you are up for an experiment, you can try the following method (not tried by me yet):
- Paint the armour with white base colour.
- Mix a blue-glaze-water mixture (I think 1:1:3 or similar ratio should be enough), go for even coverage and good transparency
- Using this mix, glaze the armour pieces and use the same two-brush trick as in Step 3 above
- This should create a visually similar outcome with less time spent on the amour
Phase 5 - Eye lenses
The only hard thing on the eye lenses is its size....they are too small for my shaky hands. Basically, you can put black paint over the eyelenses and let it flow into the small recesses around it as it will create a natural lining. Then you just add green (or whatever colour you decide to use) for highlights. My method is as follows:
Similar highlighting technique (without Livery Green) is used on Max Steiner's chest plate mistletoe), see picture above.
The only hard thing on the eye lenses is its size....they are too small for my shaky hands. Basically, you can put black paint over the eyelenses and let it flow into the small recesses around it as it will create a natural lining. Then you just add green (or whatever colour you decide to use) for highlights. My method is as follows:
- Paint AP Angel Green as base colour, keep the black lining around from the previous step.
- Water down some Greenskin, paint first highlight and be carefull not to cover too big part of the eyelens. For Rangers and Steiner, I highlighted lower and outer parts of the lenses keeping darker green in the upper part. However the Marshall has a slightly different mask so I decided to highlight the inner parts (towards his nose).
- Add second highlight of Goblin Green, again be carefull not to cover everything you have painted in Greenskin. Lines should be finer with every highlight.
- Next highlight is made with 50:50 mixture of Goblin Green and Vallejo Livery Green
- You can either stop here or add a final highlight of watered down Livery Green to the most inner parts of the eyelens. If you thin the paint down insufficiently, it will create a very sharp transition.
- If your transition between green colours seems to be too sharp (as was mine), I can recommend adding some AP Green Quickshade as it will smoothen the transition and nicely connect the greens. It also flows into recesses (black lining) and makes the lining more precise (at least it did in my case)
Similar highlighting technique (without Livery Green) is used on Max Steiner's chest plate mistletoe), see picture above.


Phase 6 - Cloaks/capes
Cloak can be handled pretty quickly if you have steady hands (Oh, how I wish I had steady hands) and some washes/quickshades. I painted the cloak similarly on all models (Rangers, Marshall, Max Steiner) with only slight differences when I was experimenting with highlights. General process:
Cloak can be handled pretty quickly if you have steady hands (Oh, how I wish I had steady hands) and some washes/quickshades. I painted the cloak similarly on all models (Rangers, Marshall, Max Steiner) with only slight differences when I was experimenting with highlights. General process:
- Use Chaotic Red as a base colour (if you have not done so at the beginning).
- Apply Dark Tone Quickshade over the Chaotic Red.
- Let dry.
- Apply watered down Chaotic Red on the raised areas
- Apply 50:50 mix of Chaotic and Dragon Red over the raised areas (paint slightly thinner lines then previous layer)
- Repeat with Dragon Red only.
- Apply Pure Red highlights (same as with the previous layers, your aim is to paint thinner lines and only paint more raised area with every layer)
- From here, there are two options available, you can either highlight by adding orange into the red (as I did on Steiner) or just a little bit of white (as on my Marshall). It only depends on what you prefer. If you decide for Orange, just add a tiny drop of orange to your red and continue highlighting until you are satisfied with the result. If you decide to go the "pinky" way, proceed to the next step.
- I added a drop of Matt White into the Pure Red and accidentaly created a very pinky colour. I used it to draw thin lines on the areas I was going to highlight further (you can see too pinky lines on the pictures below). I then tried to tone them down by adding Red Quickshade but that was not the solution.
- Having the pink on the cloak, I started adding Pure Red back into the mix and created much darker pink that I could use for the highlight. Please note that I have intentionally left both pink colours on the pallete as I wanted to use the bright pink for final highlight. (for both pink colour see picture of the pallete below)
- I then used the darker pink (with added Pure Red) to paint over the the most raised areas of the cloak to fix the bright pink madness I accidentaly caused. This actually helped a lot and created much smoother transition.
- Then it was time to apply the brigh pink again. I watered it down a lot and used the thinnest brush I have to paint very fine lines on the folds in the area of shoulders and at the bottom of the cloak.
- The finishing step was adding a wash of Red Quickshade. This helps to smoothen the potential transition between red layers and creates wonderful effect. In the end, I decided to put on two layers of Red Quickshade to tone down the highlights even more. The final effect is visible on the pictures below.


Phase 7 - Metalics
Metalic parts of the models are not a big deal. The base colour for guns, bullet belts, etc. is traditionally Gun Metal from ArmyPainter. You can then shade the guns and metalic parts using AP Dark Tone Quickshade. The raised parts were then painted in watered-down AP Plate Mail (this is optional and really a matter of taste). The last step was to highlight the edges with AP Shining Silver. For Venusian Rangers, I have also used AP Weapon Bronze on guns. The same colour was used on a bullet belt no Venusian Marshall (both cases over the Gun Metal base before quickshading) and only edge highlights (AP Shining Silver) were applied.
Unfortunately, I forgot to take pictures in the process, so here are the only ones I have of the gun before shading and when finished:


Phase 8 - Venusian Marshall's horse
If you aslo have the Venusian Marshall model, you will probably get to the phase where you will be trying to figure out a colour scheme for the horse. I must admit that I am highly influenced by the 2nd edition Forces of War book, where the Marshall is portrayed on a norwegian fjord horse. This picture had such an impact on me that I have discarded thes plan to paint a dark horse (to contrast with the white Marshall's armour] and decided to try a fjord horse too. You can find inspiration all over the Internet so do not be afraid to experiment ;-) Being a metal model, the horse is quite easily stripped...
Here is my inspiration:


At this point, I have to admit this is the first animal I have ever painted. I also have to admit that my horse has about 30 layers of colour and 3 different colour schemes before I ended up with the final one you can see on the final picture :)
I started with the horse sprayed in AP Leather Brown for undercoat as I originally intended to go for a darker brown colour. I was quickly "cured" from this idea when I figured out that alleged 100% match between AP spray undercoat and AP warpaint is not that 100% as expected. As I said before, it took me many layers of colour to figure out a decent "fjord horse look". I will skip these and go directly to the scheme I kept in the end.
So if you want the same horse as i did in the end, apply AP Skeleton Bone to any undercoat you applied. You will get weirdly looking pale horse. And this is where Vallejo Glaze medium comes in again :) Depending on the desired outcome, mix a subtle mixture of Glaze Medium + Valejjo Khaki + water (I used about 1-2:1:3 ratio) and glaze the whole horse in it. Work in sections and use a second clean and dry brush to remove the glaze from the raised areas or areas you want to look brighter. And this is the whole secret of this horse. I made some final touch-ups/highlights using a mix of glaze medium and AP Skeleton Bone and similar process as when glazing. You just apply the mix (with less water) on the raised areas and use the dry, clean brush to remove any run-offs. In the end, this was the quickest/easiest way to paint the horse.
And do not forget, there are no boundaries to your imagination, so feel free to experiment with colours, mixing ratios, etc.
The following gallery contains pictures from all phases (even the wrong ones) of the horse painting.


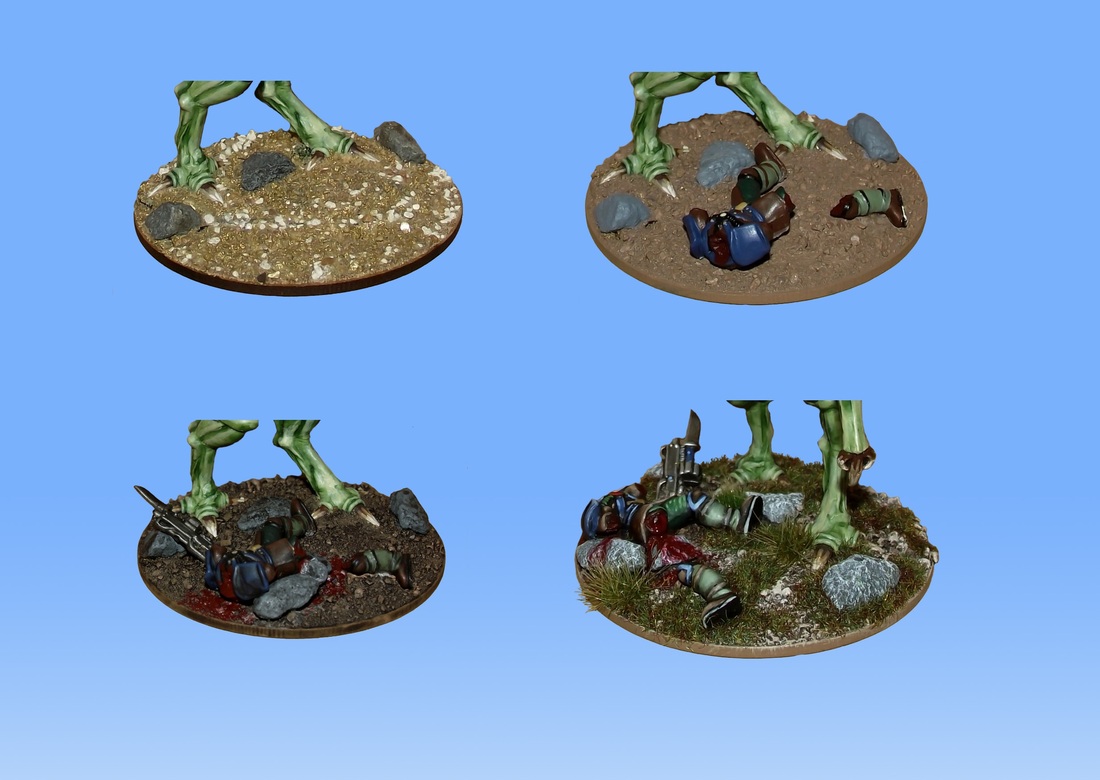
Phase 9 - Basing
After consulting the base with my brother (who will be playing the marshall and rangers on the battlefield) we decided to place the Rangers on 30mm bases and Marshall on 40mm base. As Rangers were done quite a while ago and got jungle bases (brown dirt with just few AP Battlefields tufts), it was decided to provide the marshall with a similar base. But as the miniature is much better and unique, we wanted to make its base distinctive. This is where pictures on my walls come in. On the Paul Bonner illustration, the marshall is checking a perimeter behind barbed wire in snowy environment. BUT we had a jungle style bases on rangers....now what???
In fact it was quite easy :D the marshall will be checking a perimeter in a jungle environment ... easy as a pie. All we needed to make was a small path in the jungle with barbed wire on one side. And this is how it came to be:
1) File down the metal base of the horse slightly so that it fits into 40mm base. DO NOT FILE AWAY THE HOOFS.
2) Glue the horse onto the base.
3) Add sand and rocks (I made mine from cork)
4) Paint sand with Vallejo Smokey Ink (or similar dark brown)
5) Paint rocks black
6) Let dry
7) Drybrush sand with Vallejo Earth (and then Leather Brown if brighter ground is required)
8) Paint rock with mixture of Uniform Grey (or other darker grey) with very small drop of Dark Blue
9) Add ligher grey into the mix (e.g. Ash Grey) and drybrush the rocks lightly again
10) Drybrush rocks very lightly on the edges using Vallejo Ghost Grey
11) Add AP barbed wire and paint it with patches of orange (when dry, ovebrush the orange with brown)
You can also add a spike or another feature to the barbed wire, which will help hold it in place. DO not forget to glue it to the ground at two spots at least.
12) Add tufts/grass in a manner which will leave the horse standing on a "jungle path"
13) Repaing the black edge of the base
14) TAKE COOL PICTURES OF YOUR FINISHED MINIATURE AND POST IT ON FACEBOOK OR SHARE IT WITH ME VIA E-MAIL
This concludes the Venusian Rangers/Marshall painting tutorial. Should you like to get more information, do not hesitate to contact me and ask any questions that might pop up in your head.
Looking forward to next tutorial and thanks for reading.
Looking forward to next tutorial and thanks for reading.


 RSS Feed
